
Product Review: ClearClick Photo2Digital Scanner
Pros:
Inexpensive
Faster than a flatbed scanner
No motorized or mechanical parts
Can be powered from your computer’s USB port for immediate photo transfer
Cons:
Photos can fall out of the tray and get stuck
Poor design produces shadows on photos
SD card storage can cause compatibility issues
Inaccurate negative scans
I like to treat all photos with my own kind of Hippocratic oath: first and foremost, do no harm. When it comes to scanning, that means I personally won’t ever use a scanner that uses a motorized feeder, because I don’t want anyone’s photos to get damaged or torn by a motor. However, that means that I’m sacrificing speed, which can be an issue when I’m scanning in a few thousand photos for a customer order. I’m always looking for ways to optimize that process, so when I came across the Photo2Digital Scanner from ClearClick, I figured I’d take it for a test run.
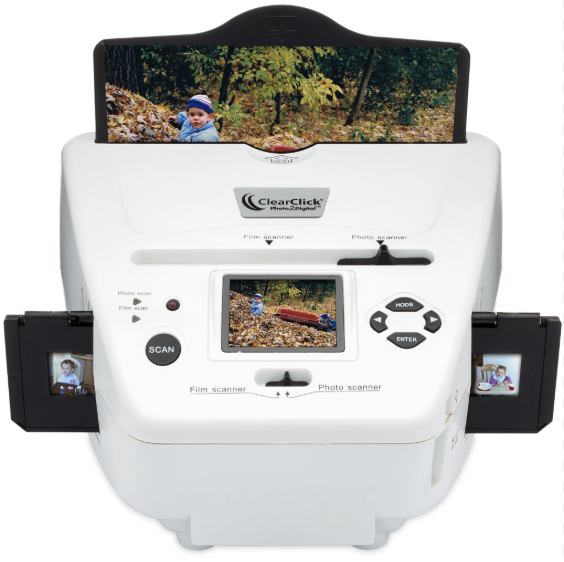
Unlike most flatbed scanners, which act a lot like an office copy and scan machine, the Clear2Click scanner is kind of built like a pizza oven with a camera inside. It has a photo tray, with plastic attachments to change the size of the holder to standard photo measurements of 3×5”, 4×6”, or 5×7”. My scanner came with a power cable and a complimentary professional version of PhotoPad, which was a nice addition. PhotoPad is a decent standalone alternative to PhotoShop, but that’s another review for another time. The scanner has two modes: photos and slides. For standard photographs you would put it in photo mode, while slide mode is for slides or photo negative development. There is a small monitor on the front, which defaults to a menu that lets you select from options such as pixels per photo, or go into scanning mode. The photo is slid into place on the tray, and the tray is inserted into the scanner. Scanning mode brings the photo up on the display and allows you to flip the vertical and horizontal axes if desired. Press a button, the screen flashes, and the photo is scanned. You then remove the tray, switch photos, and repeat. With proper organization of photo size, I was able to average approximately 4-6 photos per minute, which is much quicker than a flatbed scanner.
That 4-6 photos per minute comes with some caveats, however. First of all, any photos which were even slightly curled were at risk of getting stuck in the scanner when I attempted to remove them. When that happened, I had to put the device on its back and use a butter knife to help extract the tray and photo. The scanned photo quality is also…ok, I guess? I was able to see some details on the scan that were difficult to see on the paper photo itself, and the resolution is fine, but even when on its highest setting, the scans still top out at 72 DPI (dots per inch). For reference, 300 DPI is considered a decent minimum for digital photo storage, and 600-1200 DPI is required for any kind of archival storage. What this means is that if a photo scanned properly, it would probably look fine, although details would immediately look blurry, especially if you zoom in on them.
I mentioned “if a photo scanned properly,” which brings me to by far my biggest issue with this scanner. It cannot handle photos that are dark. Like, at all. If a photo is remarkably well-lit and has vibrant colors, the scan comes through well enough. However, if the photo comes from a poorly lit area, you will notice, as I did, that there is a dark box in the middle OF EVERY PHOTO. Sometimes the dark box will have a lighter ring inside of it. I contacted ClearClick customer service about this issue and was told it was a structural issue because of how the scanner is built. The agent on the other end also immediately offered to begin the return process, which was appreciated. Essentially, the photo goes in, the wall behind the internal camera generates yellowish-white light, and the camera takes a picture to scan. Because the inside of the scanner is light gray, the light bounces off the wall and “burns” the outline of the camera itself into the photo. I personally found the area outside of the boxes to be oversaturated and washed out, and the box was the only part of the photo that captured the colors of the photos properly, but still, this kind of an artifact is a deal-breaker. I could not quickly or easily remove the artifact with photo editing software, rendering some of the scans essentially useless. Oh, and if you have those instant photos with the white borders from Kodak cameras in the 80s or 90s, don’t even bother trying. The border was in every scan, so you’d have to crop the photos after scanning just to get a clean image, which would still usually have the outline of the camera burned into it.
Unfortunately, things didn’t go much better with processing photo negatives. The scanner came with holding trays for the negatives, but only in one size, and they didn’t quite line up properly. I could see how it was supposed to work: you put the negatives in the tray, put the scanner in slides mode, and then push them through one by one, capturing the images one at a time. The reality was that I had to regularly remove the whole setup to shift the negatives in the tray. The processed images also came out with a distinct yellow tint to them, although that could be because of age and damage to the negatives, which were around 50 years old.
In closing, avoid this scanner unless no other options are available. It has a very affordable price ($160 vs. $500 or so for a midrange flatbed scanner), but the quality of the scans will leave you wanting more. I appreciate the concepts that ClearClick put into their scanning platform, and maybe it would work better if the entire interior was a matte black paint, but the execution simply isn’t there. It will perform the job of making some kind of digital image of your photos, but your memories and the people inside those photos deserve to be handled properly.